How to Manage Notification Templates
Notifications are sent to workflow users to notify them about steps they must make or to inform them about the status of workflow steps. You set up who receives notification and when by setting up approval users, the users’ notification schedule, and the involved workflow responses to define the notification recipient. For more information, see Setting Up Workflow Notifications.
Notifications are based on templates that define the content and layout of the notification. You can export the content of a notification template, edit it, and then import into the same or a new notification template. This is described in the following procedures.
The generic version of Dynamics NAV contains three notification templates, one for notifying about approval requests, one for notifying about new records, and one for notifying about overdue approval requests. The three predefined notification templates support Email and Note as notification method. To view the content of the three notification templates, see the “Content of the Notification Templates” section in this topic.
To create a new notification template
- Choose the
 icon, enter Notification Templates, and then choose the related link.
- In the Notification Templates window, choose the New action.
Fill the fields as described in the following table.
| Field |
Description |
| Code |
Identify the notification template. |
| Description |
Describe the notification template. |
| Notification Method |
Specify if the notification is sent as an email or as a note. |
| Type |
Specify the business process that the notification will be used for.
Select one of the following types:
- Approval specifies that the template is used to notify users in approval workflows.
- New Record specifies that the template is to notify approvers when a new record, such as a customer card, needs their approval.
- Overdue specifies that the template is used to notify users about overdue approval requests. |
| Default |
Specify if the notification template will be used by default. |
To modify a notification template
- Choose the
 icon, enter Notification Templates, and then choose the related link.
- In the Notification Templates window, select the notification template that you want to modify.
- Choose the Export Template Content action.
- In the Export File window, choose the Save button, and then name and save the HTML file in an appropriate location.
Right-choose the file, choose Open with, and then choose the relevant program.
NOTE
Content for notification templates of type Email are in HTML format. Content for notification templates of type Note are in TXT format.
Edit the content of the notification template by adding, changing, or removing parameter variables to define the content that you want, and then save it. For more information, see the “Content of the Notification Templates” section.
Proceed to import the modified content back into the same or a new notification template.
To modify the notification template that you exported, in the Notification Templates window, select the template that you selected in step 2.
Alternatively, to import the modified template content into a new notification template, follow the “To create a new notification template” procedure, and then select the new notification template.
- Choose the Import Template Content action.
- If you are modifying an existing notification template, choose the Yes button on the message about overwriting the existing template.
- In the Select a file to import window, choose the HTML file that you modified in step 6, and then choose the Open button.
The existing or new notification template in the Notification Templates window is now updated with the modified content.
Content of the Notification Templates
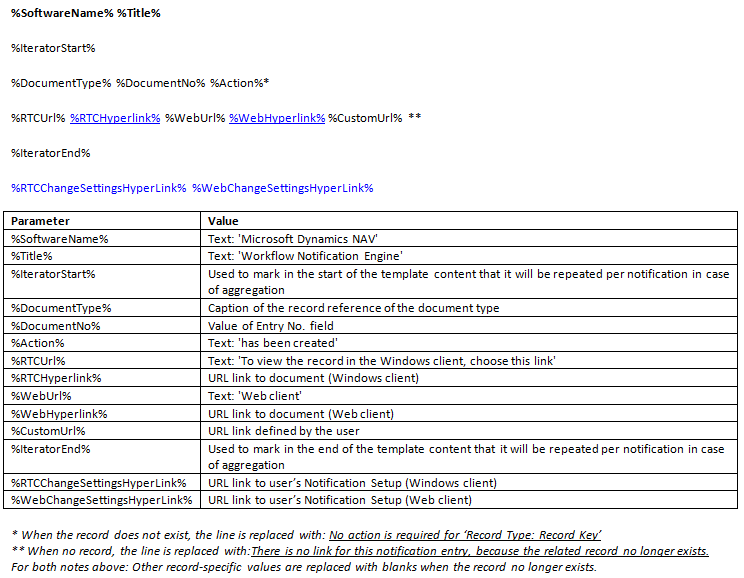
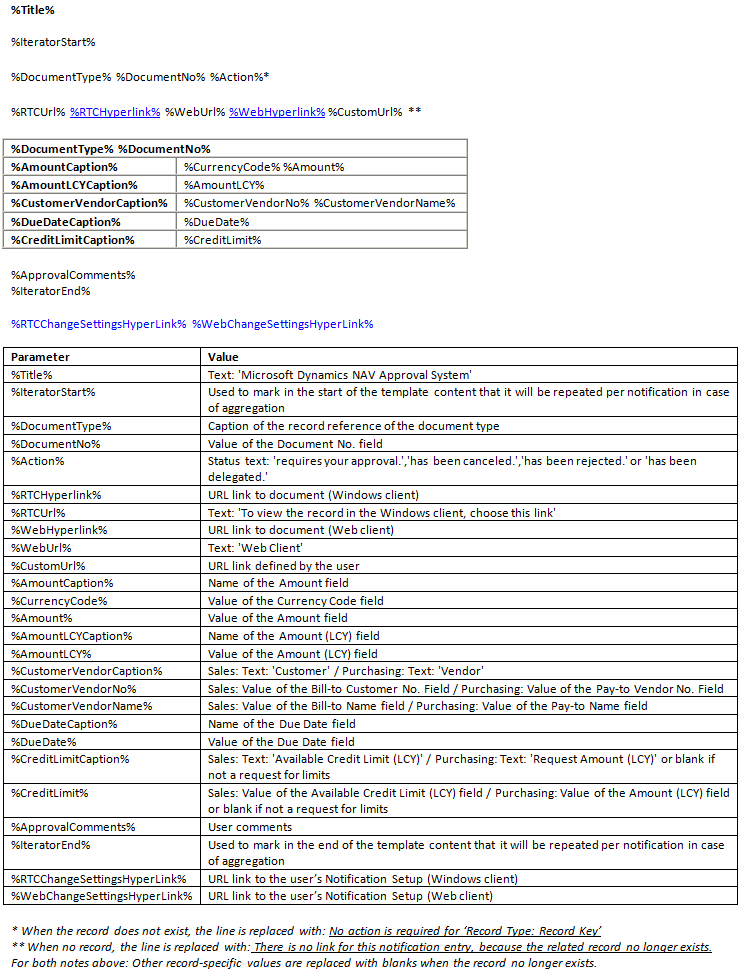
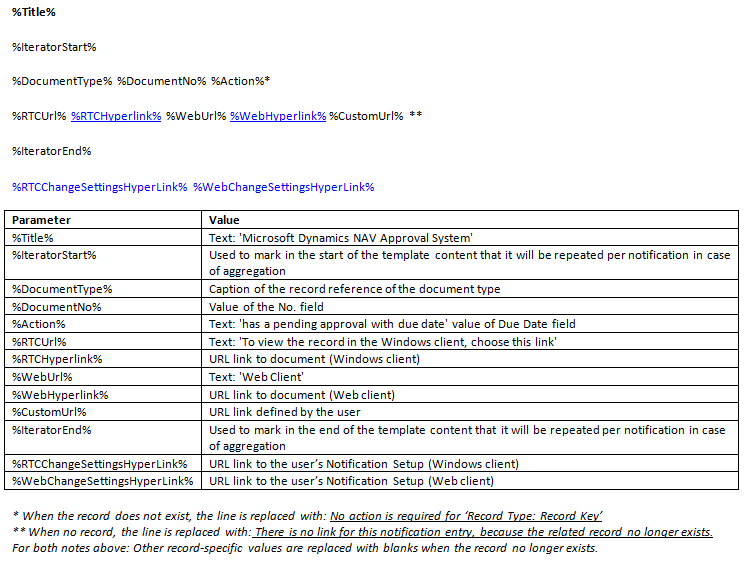
The three notification template types, New Record, Approval, and Overdue, have different content.
Parameter values are automatically inserted in notifications according to the notification template type.
New Record

Approval

Overdue

General
%SoftwareName% %Title%
%IteratorStart%
%Workflow% %WorkflowDesc%
%Action% %DocumentType% %DocumentNo%
%RTCUrl% %RTCHyperlink% %WebUrl% %WebHyperlink% %CustomUrl%
%IteratorEnd% %RTCChangeSettingsHyperLink% %WebChangeSettingsHyperLink%
| Parameter |
Value |
| %SoftwareName% |
Text: 'Microsoft Dynamics NAV' |
| %Title% |
Text: 'Workflow Notification Engine' |
| %IteratorStart% |
Used to mark, in the start of the template, content that it will be repeated per notification in case of aggregation. |
| %Workflow% |
Text: 'Workflow' |
| %WorkflowDesc% |
Description of the workflow. |
| %Action% |
Text: Event that occurred to trigger the notification. |
| %DocumentType% |
Caption of the record reference of the document type. |
| %DocumentNo% |
Value of the No. field. |
| %RTCUrl% |
Text: 'To view the record in the Windows client, choose this link.' |
| %RTCHyperlink% |
URL link to document (Windows client) |
| %WebUrl% |
Text: 'Web Client' |
| %WebHyperlink% |
URL link to document (Web client) |
| %CustomUrl% |
URL link defined by the user. |
| %IteratorEnd% |
Used to mark, in the end of the template, content that will be repeated per notification in case of aggregation. |
| %RTCChangeSettingsHyperLink% |
URL link to the user's Notification Setup (Windows client) |
| %WebChangeSettingsHyperLink% |
URL link to the user's Notification Setup (Web client) |
See Also
Setting Up Workflow Notifications
How to: Set up Email
How to: Set Up Workflow Users
How to: Set Up Approval Users
How to: Create Workflows
Use Job Queues to Schedule Tasks
Workflow
© 2018 Microsoft and IndustryBuilt. All rights reserved.
JustFood 2018 (11.00.00.00) | February 2018
 icon, enter Notification Templates, and then choose the related link.

